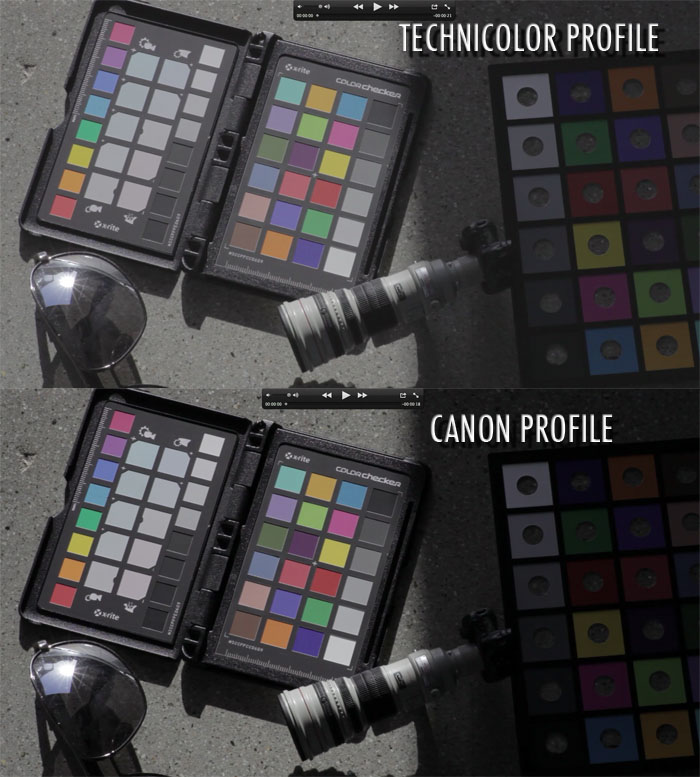
I’ve just got the Canon C300 for one week and I want to share my thoughts with you. Lots of people asked me if I can do a comparison between Canon C300 C-Log Picture Profile and Sony F3 S-Log. First of all, the Canon C300 is an impressive camera, I really like the form factor. My first thoughts: Wow! Feels like a DSLR, small, compact, you can still use all your gear you’ve bought for your DSLR. That’s cool. There is a cool frame grab for you, which shows you the difference between S-Log and C-Log. I’ve uploaded a Tiff-Version (I recommend downloading this one, because it has no compression) and a JPEG-Version. Would love hearing your thoughts on my blog, Twitter and Facebook! I used my KiPro Mini for uncompressed external recording. The Sony F3 was set to 0db, ProRes HQ 10-bit, 5600K, S-Log, the C300 0db, ProRes HQ 8-bit, 5600K, C-Log. I mounted Zeiss glass on both cameras. On the C300 the Zeiss ZF.2 85mm 1.4, on the F3 the Zeiss CP.1 85mm 1.5. Both lenses have the same optics!! There is a difference between Sony F3 S-Log and Canon C300 C-Log. S-Log has much more picture information…
Today I noticed a dead pixel while editing a corporate film for a client. I asked on twitter if there is any solution to fix this dead or hot pixel. @GEPD on Twitter sent me a link to a short clip on YouTube, which is a great tutorial for people like me. Today I was the lucky guy and it worked out perfectly. You need some luck, it’s like a lottery, sometimes it works, sometimes not… If you have any problems with your sensor (dead pixels, hot pixels), follow these instructions, it may help you! Good luck and a huge thank you to @GEPD on Twitter!

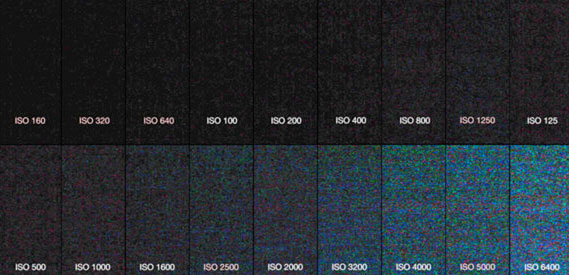
My twitter buddy Andrew Schär made this informative test, which shows you the best ISO settings for your Canon DSLR in video mode. He used a Canon 60D with an APS-C sensor (the same sensor is in the Canon 550D (T2i), Canon 600D (T3i) and Canon 7D). If you are shooting video with your DSLR you should use the following ISO settings: 160, 320, 640, 100, 200, 400, 800, 1250, 125, 250, 500, 1000, 1600, 2500, 2000, 3200, 4000, 5000, 6400 I’ve always used these settings. I start at 160 ISO, then 320, 640, 1250, 1600… You can follow Andrew Schär on twitter and Vimeo!

It’s finally out: The Technicolor CineStyle Picture Profile for Canon DSLR cameras! © Vincent LaForet – All Rights Reserved I’m always shooting with a flat picture profile, which I can manually set directly in the camera (Sharpness 0, Contrast -4, Saturation -2, Color Tone 0). Now there is a much better solution available. I’ve seen the Technicolor Picture Profile at NAB and was really impressed. Now they released the free Picture Profile on their website. Yes, it’s free! Jump ahead to get more info about this picture profile. After loading the profile on your camera, you will achieve much more dynamic range. It’s a perfect choice for any application, e.g. Imagefilm, Productvideo, Documentary or any Commercial. The latitude improvement is significantly. It works on a Canon 7D, Canon 60D, Canon 550D (T2i), Canon 600D (T3i), but it was mainly developed for the Canon 5D Mark II! More ressources for additional information on blogs: Vincent LaForet Zech’s Camera How to load Technicolor CineStyle into your Canon camera: Ensure that EOS Utility v2.6 or later is installed on your computer Download the Technicolor CineStyle Picture Style file using the link on Technicolor website Connect your camera to your computer using the appropriate…
My friend Nino Leitner has found a very impressive solution how to fix the rolling shutter issue. The new version of the consumer editing software iMovie 11 is the key to solve the well known problem, which has nearly every CMOS digital camera. Apple introduced iMovie 11 at the “Back to the Mac” event a few weeks ago. It has many improvements, and is a good editing software, if you are an amateur. The only downside is, it does not work within Final Cut Pro and the bit rate of your original Pro Res 422 file is lost, if you import it into iMovie 11. But, it works really well and shows what is possible with iMovie 11. It would be great to see this and more features in Final Cut Pro! A short test by my friend Nino: Here is a great tutorial by Philip Bloom:


